 Let’s say you are planning to install an EV charger in your home. You click around and you discover that the particular EV charger you really want to get is available with either of two plugs — a 6-50P plug or a 14-50P plug. You figure that this means you could pick a matching receptacle — a 6-50R receptacle or a 14-50R receptacle. Which of the two receptacles should you pick for your electrical installation? Should you order the EV charger with the 6-50P plug or the EV charger with the 14-50P plug? It turns out that these are all trick questions!
Getting all 48 amps. If you hard-wire your EV charger (in other words if you have the self-control to avoid using a plug and receptacle) on a suitable circuit, then you can charge your electric vehicle at 48 amps instead of a mere 40 amps. Instead of having to wait, say, six hours to charge up your car, you would only have to wait five hours. I absolutely promise you that sometimes, avoiding having to wait an extra hour is going to really make a difference in some urgent situation.
Let’s suppose you have two electric vehicles that both need to get charged, and let’s suppose you are going to charge them one after the other (because you have only this particular EV charger to work with). In such a case, you could start charging the second vehicle an hour sooner than if you only had 40 amps available.
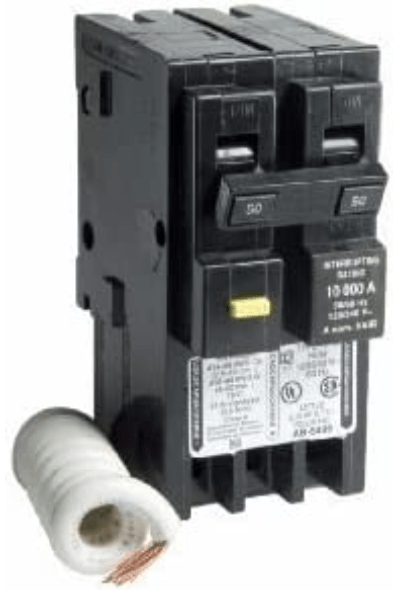
Saving money on circuit breakers. If the path that you choose for your EV charger installation is the “receptacle” path instead of the hard-wired path, then you will be stuck having to purchase a much more expensive circuit breaker. You will be stuck having to pay well over a hundred dollars for a so-called “GFCI” circuit breaker. A 2-pole 50-amp GFCI circuit breaker (example at right) is a very expensive and bulky breaker, taking up a width of five inches inside what is probably already a cluttered and nearly full load panel.
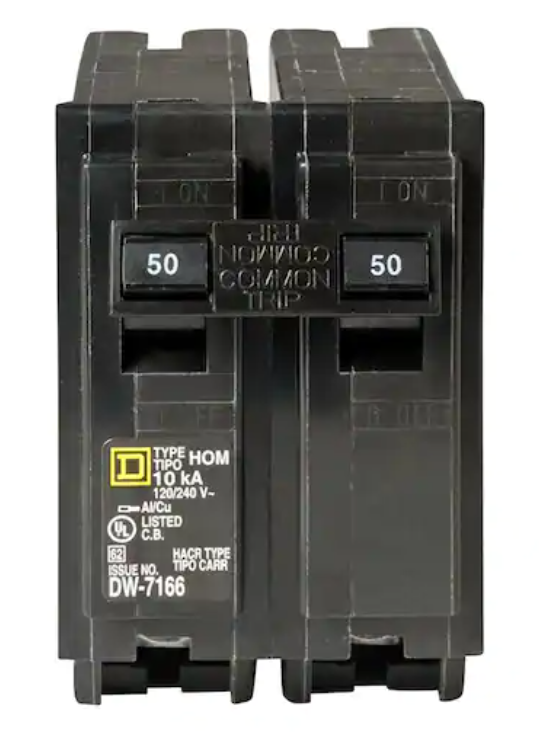
In contrast, if you choose the hard-wired path for your EV charger installation, you get a free pass on the expensive GFCI breaker. Instead, you get to use the cheapest circuit breaker that money will buy — a “standard-trip” breaker (example shown at right). It costs less than $20, taking up only 2½ inches of width and thus only half as much volume in your already nearly-full load panel.
Part of why you get the free pass is that if you study the documentation on your EV charger, you will see that it already has a GFCI function built in to the EV charger.
Maybe you don’t have two open positions in your load panel. The next thing to think about is that maybe you don’t have two open positions in your load panel! If this is your situation, then you would need to add a sub-panel (which is a lot of money and a lot of work) or you would have to somehow get your hands on a quad 2-pole common-trip breaker. Such breakers are hard to get these days (see blog article). The reason that such breakers are scarce these days is … you will never guess why! … because lots of people have suddenly figured out that they want to install an EV charger in their home.
Yes, if you choose the “receptacle” path, then to find a home for the expensive and bulky GFCI circuit breaker, you need to satisfy one or another of these conditions:
- be lucky enough to have two open positions in your load panel, or
- fuss around with quad 2-pole common-trip breakers, or
- add a sub-panel.
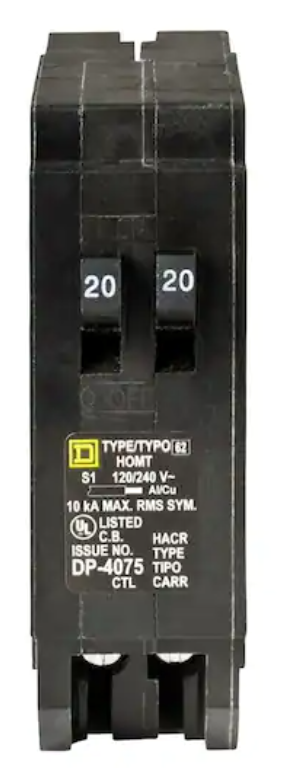
I know what you are thinking — you can simply take some single-pole circuits in your load panel and combine them into so-called “tandem” breakers such as seen at right. And this will free up some positions for that big and bulky 2-pole GFCI breaker. Yes, this may be possible, but it looks embarrassing to have such itty bitty breaker toggle levers in your load panel, and it is not easy to give numbers to them in your circuit index. What’s more, your load panel probably only permits such “tandem” breakers to be installed in a small number of specific positions in the load panel.
Keep in mind as well that any time you are getting ready to install a 2-pole breaker into your load panel, you cannot use just any two positions for it. The two positions need to be adjacent.
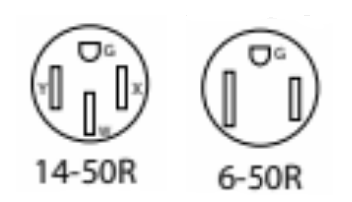
Cost per foot of electrical cable. The alert reader will realize that if you are going to install a “14” type receptacle, you need to provide four wires:
- a black wire for a first one of the two poles (Y and X, at 240 volts, or maybe 208 volts);
- a red wire for a second one of the two poles;
- a green wire for the ground terminal (G at top in the figure); and
- a white wire for the neutral terminal (W at bottom in the figure).
In contrast, if you are going to install a “6” type receptacle, you only need to provide three wires:
- a black wire for a first one of the two poles (Y and X, at 240 volts, or maybe 208 volts);
- a red wire for a second one of the two poles; and
- a green wire for the ground terminal (G at top in the figure).
Copper is very expensive these days, and the six-gauge wire that you need for this kind of wiring has a lot of copper in it. If you use MC (metal clad) cable, for the “14” type receptacle you will need “6/3 with ground” cable at maybe $5-6 per foot. For the “6” type receptacle you will only need “6/2 with ground” cable at maybe $3-4 per foot. The same situation presents itself if somehow you are able to use “Romex” or NM (non-metallic-clad) cable — again you can avoid the cost of one very expensive six-gauge wire if you have the self-control to use the “6” type receptacle instead of the “14” type receptacle.
Note that if you use the MC or NM cable in a 6/2 style, its wire colors will be black and white, not black and red. To comply with code, be sure to have some red electrical tape on hand and use it to mark the white wire at both ends. This helps the next person understand that the white wire is being used as if it were red in color.
This also saves money if you are hard-wiring the EV charger! The alert reader will realize that this choice of 6/2 cable rather than 6/3 cable also saves you money for a hard-wired installation. What you will find if you click around on the documentation for lots of EV chargers is that they never require a neutral wire! The EV charger only requires that you connect two poles of “hot” wire (amounting to 240 or 208 volts) and a ground. Three wires total. So if you were to spend the (unnecessary) money to purchase and install 6/3 cable, you will leave the white wire dangling (not connected to anything) at the EV charger end of the cable. It is just a waste of money to purchase an expensive neutral wire and then not connect it to anything.
6/3 cable is harder to wrangle than 6/2 cable. One more thing that people often fail to think about until it is way too late to do anything about it, is that wrangling heavy-gauge cable is not easy. (If there are four conductors in the cable, then it will be stiffer than if there were only three conductors in the cable.) It requires a lot of physical strength to force 6/3 cable to go around corners and to fish it through soffits. If you have the self-control to skip the (unneeded) neutral wire, then you will only have to force the more flexible 6/2 cable to go around corners, and to behave as you try to fish it through difficult spaces.
Cleaner looking installation. If the EV charger is hard-wired, this will likely be a cleaner looking installation. It looks awkward and visually cluttered to have a very big and fat cable and plug hanging down from the EV charger, only to have the plug inserted into a big receptacle.
An installer may refuse to do anything other than hard-wiring of the EV charger. If you hire an installer rather than doing this EV charger installation yourself, you may find that you have no choice about it. Many installers these days simply refuse to go the “receptacle” route. The installer will prefer to run only 6/2 cable instead of 6/3 cable (saving money and easier wrangling). The installer will prefer not having to find space in the load panel for a very expensive and twice-as-bulky GFCI breaker. The installer will prefer the cleaner look of a hard-wired installation. The installer will prefer not to finish with a receptacle, which presents safety risks because somebody might stick a paper clip into one of the slots and get shocked. The installer will prefer the customer satisfaction of faster charging (48 amps instead of only 40 amps).
But maybe you really want to install a receptacle! But let’s suppose that you have absolutely convinced yourself that the path you want to follow is the “receptacle” path. If so, then should you pick the 14-50R or the 6-50R receptacle?
By now we have agonized our way through this sufficiently that you can see the advantages of picking the “6” type receptacle. You won’t need to purchase and wrangle a fourth wire that won’t be needed anyway, if you pick the “6” type receptacle.
But of course that may not be the whole story. Suppose you have in mind that this receptacle will get used for two things — charging an EV and something else.
Welding machine? Suppose, for example, that you sometimes will want to use this receptacle for powering a welding machine? It turns out that many welding machines have a 6-50P plug, and it turns out that very few welding machines have a 14-50 plug. So if you are going to do some welding, maybe the 6-50R receptacle will be the way to go.
Recreational vehicle? Suppose, for example, that you sometimes will want to use this receptacle for powering an RV (recreational vehicle)? It turns out that many larger RVs use a 14-50 plug. So if you are sometimes going to power an RV, maybe the 14-50R receptacle will be the way to go.
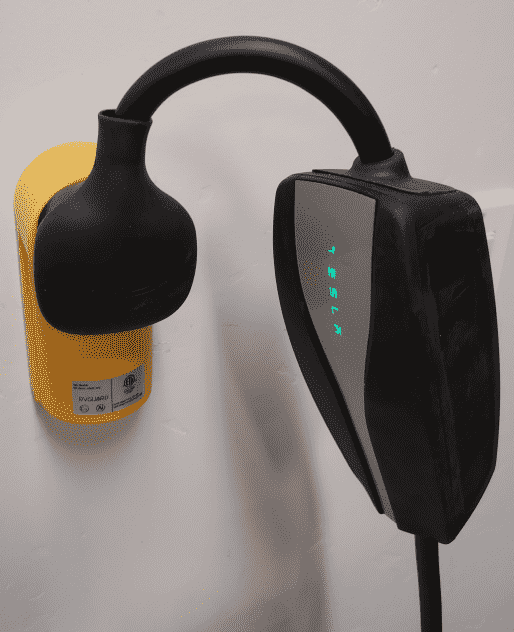
Orientation of the receptacle. Let’s suppose that against all odds you are stuck on the idea of installing a receptacle rather than hard-wiring your EV charger. If so, then I urge you to give some thought to how to orient the receptacle. You can see at right what happens if you fail to think about this. For the 6-50 receptacle, the cord and plug for the Tesla Mobile Connector will be awkward if you put the ground terminal “down” in the orientation.
Part of the problem here can be what happens if you (for example) hire an electrician to install your new 50-amp circuit, and if you don’t say anything to the electrician about what you plan to do with the circuit. Or even if you tell the electrician that you plan to use the circuit for an EV charger, the electrician may not know which orientation might be the best orientation for your needs. Look at the yellow surface-mount receptacle in the photo above, and you will see that the writing on the receptacle is right-side up only if the receptacle is oriented in the worst direction.
Take a look at the plug on your welding machine, or the plug on your RV power cable. Almost certainly it will turn out that one orientation is completely wrong, and another orientation is exactly right for your needs. For each plug I looked at, the best orientation is to put the ground terminal “up”.
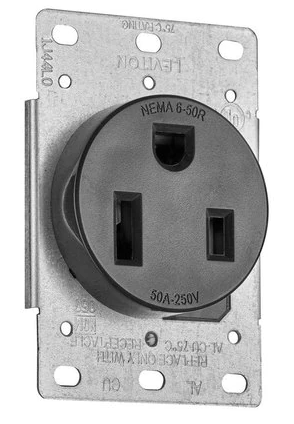 Which brings us around to a type of receptacle to pick. If you pick a surface-mount box such as the yellow one shown above, then it can be awkward to orient it in the way that will work best. But if you pick a flush-mount receptacle like the one shown at right, you can have complete control over the orientation of the receptacle. You can, for example, put the ground terminal “up”, as shown in the photo at right.